Trompe L’Oeil Sleeve Caps (Part 2)
June 27, 2011 § 3 Comments
It was that gracious hour of a summer afternoon, mid-way between luncheon and tea, when Nature seems to unbutton its waistcoat and put its feet up. In the shade of a laurel bush outside the back premises of this stately home of England, Beach, butler to Clarence, ninth Earl of Emsworth, its proprietor, sat sipping the contents of a long glass and reading a weekly paper devoted to the the doings of Society and the Stage.
At this moment, the laurel bush, which had hitherto not spoken, said ‘Psst!’
-Summer Lightning, P.G. Wodehouse 1929
At the end of Part I, we left off with two shoulder pieces, with 14 stitches between the stitch markers establishing the tops of your sleeve caps, and mirroring back neck shaping. Both shoulder pieces should be ending with a wrong side row. The next step is to connect your shoulder pieces with cast-on stitches for the back neck.
What I like to do is use a long tail cast on using the yarn end dangling off the back side of the right shoulder piece. Just calculate how many stitches you’ll need for your back neck (I used 42 here for about a 6.5” back neck in sport weight) and cast on.
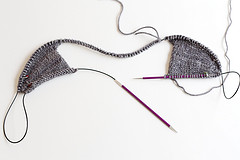
You now need to align your two shoulder pieces and your back neck cast-on on the cable of a long circular needle. It should look something like this:
Note the loops of cable pulled out at the points of the shoulders. Until your work grows a little longer to create more width in the sleeve cap sections, you’ll need to pull out loops at the points of the shoulders magic loop-style to help you get around that tight curve.
Now you’re ready to knit your sweater upper body in one piece. Start with the left front right side (your work will be facing you as though the above photo were upside-down), knit along the left front to the first marker, slip marker, do a left-leaning, RS, row below (RB) increase into the next stitch. Knit across the left sleeve cap (adjusting cable mid way through the sleeve cap magic-loop style as needed) to one stitch before the next marker and do a right-leaning, RS, increase into that stitch, working the original stitch, and slip the marker. Work across the left back section, keep working across the back neck cast on, and across the right back section to the marker. Slip marker, do a RS left-leaning RB increase into the next stitch, work across left sleeve cap section to one stitch before the marker, work a RS right-leaning RB into the next stitch, working original stitch, slip marker and work right front. Keep working back and forth RS and WS as established, adding front neck shaping (if working a pullover, you’ll join the fronts and work in the round).
This brings us to the question of sleeve cap shaping; in other words, your rate of increase as you move down the sleeve cap to the armhole. One of the major inspirations for this method was Jared Flood’s VK article on the simultaneous set-in sleeve worked from the bottom up. In that article he suggests (looking at it now as decreases working up the sleeve cap from the armhole division) no decreases on the sleeve cap side while body-side armhole shaping is taking place; every other row decreases as you move up the sleeve cap, until you reach a 50% reduction from your original top of sleeve stitch count; then every row decreases until about 8 stitches remain in the sleeve cap, and then 4 or so every other row decreases worked back and forth. (**Used with permission from Jared Flood)
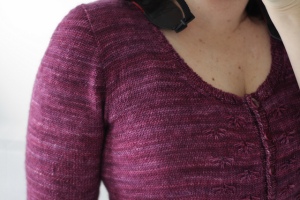
For my prototype sweater (working down the sleeve cap again now), I used one alternate row increase, then every row increases until I reached 50% of the stitches I’ll want at top of the upper arm, then every other row increases until I reached the !00% number minus the underarm cast-on. Once I reached that count I worked straight (about an inch or so) to the armhole division. The result is here:
Being the nit-picky knitter that I am, that little fold of extra fabric on the sleeve cap mid-way down the armhole bugs me to no end. I’ve given some thought to why it’s there and how I can eliminate it on my next test sweater however. If I compare my own measurements to the standard size tables, I find that my upper arm measurement is somewhat above the standard, while I think my shoulder itself is of more standard proportions. Therefore, because I was working to my slightly oversize upper arm measurement, the cap itself ended up wider than it needed to be at the mid-point of the sleeve cap relative to my comparatively smaller shoulder. Next time I will try working every row increases until there are 50% of the stitches for a standard upper arm size, then work every 4th row increases through the middle of the sleeve cap. Finally, I’ll put in my extra stitches needed to accommodate my upper arm, split between consecutive row increases just before the division for the arm at the base of the armhole on the sleeve cap side and a few extra stitches cast on under the arm.
In general, when I look at what I think of as a classic sleeve cap – say a schematic from a Rowan/Kim Hargreaves pattern, what I see is a sleeve cap with a steep rate of decrease at the base of the sleeve cap, a more shallow slope through the middle, and a steeper rate again towards the top of the cap. So my plan for next time will more closely mimic that kind of sleeve cap. It will require more planning and an accurate measurement of my row gauge, but I’ll be very happy to see if it improves on my first prototype. It’s also possible that people whose bodies more closely conform to the standard may be quite satisfied with the original formula.
So stay tuned for more thoughts once I’ve made a new sweater incorporating my new shaping plan! In the coming weeks and months, I hope to start a Ravelry group for those interested in trying it out, and to post some video tutorials on the Row Below increase and on the method in general. Thanks again for your interest and I would love to hear from anyone who is trying this out.


make sure you pm me – cause i’ll join your group! i want to learn to do this!
I just came across your articles, looking with the help of Google for alternative top down knitting methods. If you start a group on Ravelry, please count me in! I’d appreciate if you let me know. My username there is Krosh. I’ll be willing to help as a tester if you need one!
I found it very interesting that your method! I’ll try to play here!